Image Hosted by ImageShack.us

Sabtu, 20 Desember 2008

Tutorial Flash Odm motorola without box

ada 2 cara untuk flash odm motorola..:
1.pake ubl crack dengan koneksi ufs

2.pake dmtool koneksi nya pake kabel prolific

Ubl crack
a.seblom nya kita Download dulu Ubl crack nya disini...
kalo uda buka motorock.dan pilih "odm models"

b.setting com port nya pilih pake ufs,dan pilih tipe hape nya...

c.tekan write flash...pilih firmware yg sesuai

d.maka akan ada perintah tekan power on.tekan power dan proses flasing di mulai..

nb:

langkah d memang aga sulit..kl proses flash belum berjalan..ulangi sampe berhasil.ohya lupa,untuk koneksi pake ufs kabel nya pake t190

dmtool

untuk Dmtool bisa download dsini

dan tutorial nya download disini

untuk kabel nya pake yang ic driver nya pr0lific

maf lagi males ngetik nih..untuk file flash nya request aja yah...

Selasa, 16 Desember 2008

TUTORIAL PENGGUNAAN Sedbx

Kita Coba Memberikan sedikit tambahan buat pengguna UFSxHWK by SarasSoft mudah-mudahan dapat sedikit membantu :
KIta coba kasih contoh penempatan susunan untuk type K810i dan untuk type yang laen juga sama untuk susuan penempatan firmware/flash files.

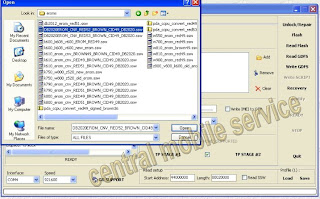
MCU 1 = Flash File Utama(Untuk Mcu yang Besar)

MCU 2 = File System (Untuk Mcu yang lebih kecil)

MCU 3 or 4 = Update Agent (untuk Mcu yang kecil juga isi nya FOTA/EROM/CERT)

CUST = BIB or BIC file (File ini di pergunakan apabila hand phone mengalamani configurasi yang rusak atau error)

Jika semua kebutuhan diatas susah di isi, maka klik tombol "Flash"

File MCU dapat disusun dengan berbagai cara, tetapi saya menyarankan untuk menggunakan sesuai dengan contoh diatas, karena itu adalah susunan flash yg benar, update agent bukanlah file yg dibutuhkan, anda tidak perlu mengupdate update agent,

Cara nya :

1. Hubungkan telpon tanpa batere ke kabel, klik "boot", kemudian masukkan batere.

2. Tidak perlu memilih model, software akan memilih model melalui telpon TAC, jika telpon TAC tidak terdapat / tidak muncul di database TAC, silahkan pilih telpon secara manual dari list yg ada

3. GDFS info on boot(informasi GDFS di boot) - opsi ini akan menunjukkan informasi yg sangat dibutuhkan, seperti versi CXC dan CDA, dengan catatan bahwa opsi ini tidak berfungsi untuk semua jenis telpon.

4. Load/save dari/ke ini, setelah anda selesai mensetup flash file yg dibutuhkan, anda dapat mengklik "save to ini (save ke ini)" dan ia akan menyimpan nama dari user (pemakai), ingat bahwa setting ini akan membaca secara otomatis boot pada telpon, jika TAC tidak muncul/eksis, pilih model secara manual, kemudian klik "load from ini"

5. jika anda mengalami suatu flash error (error pada flash), coba ulangi proses dari awal, jika tetap masih error, klik "generate log" dan kirimkan hasilnya (output) ke sini

Senin, 15 Desember 2008

TUTORIAL Flash with Spiderman Crack

Download Direct com Here

Download Cable pinout Here

This video download Here

How do I install skins E398?

his tutorial applies for 373 firmware users.
1 .Download P2K commander

2. Start it

3. Connect your phone with the datacable

4. From the top click on Settings and select drive /c

5. At the left select your harddrive and browse the folder where you have the skin files

6. At the right browse the mobile 'c' drive - go to /c/mobile/skins

7. On the mobile create a folder with the skin name (Exact name as the ski file - for example if the you have SkIN23kkP.ski - create folder SkIN23kkP)

8. Browse the new folder. Select all *.dat and *.ski files from the hard drive and clip COPY to copy them to the mobilethe following are optional

9. Depending on the skin (it should have readme) you need to copy the wallpaper file to /a/mobile/picture or /c/mobile/picture or to the skin folder. Most probably it is /a/mobile/pictureLast

Setool Card Cracked 100%. Free Upgrade.

ATENTION: Compatibles cables:
For phones with Eric connector: J300 k300i K500 K600 K608 K700 Z500 V600 V800 Z800 Z1010, use cable T28 COM, T28 USB, cable TMS 2 in 1, Cable Cruiser, Base DSS.


For phones with FastPort connector: J220i J230i K750i D750i W550i W800i Z520i , use cables con USB-FTDI: Cable Cruiser - Cable TMS 2 en 1 - Cable Davinci.
Note: With the TMS cable is necesary to use the drivers USB_Driver_FTDI_TMS_news, don't use the originals.
-------------------------------------------------------
Important information:

Phone always off, and without SIM card. Battery fully charged. before any operation, changhe the CID to RED 36, and always leave marked in "Settings" the boxes“Set color RED alter operations” .

Before any operation, do a backup of your GDFS. just follow to the step 3 of this guide, after that, click Read GDFS. A file will be created automatically in the folder of Setook called “GDFS.bin”, save in a secure place.

Debrand/upgrade or change language.

You need the files fo the firmware (MAIN and FS). You can download Here
1- Select the port and velocity. Mark the boxes RTS y DTR.
2- Click in "Sony Ericsson"
3- Click “clear names”
4- In "Main File Firmware" click in […] and select the MAIN file with extention "mbn". In "File system image" click in […] and select the FS file with extention "fbn". [/b]
5- Select the model of your phone
6- Select a CDA from here (select you model first):Here . Is important that this field must not be blank.
7- Click in Settings.
8-Check the boxes “Set color RED alter operatios” and “Complete Phone.”
9-Click Flash. Wait for the finish message.

All the data in the phone will be lost! Do a copy of your contacts and data before use this software.

If you don't select "Complet Phone" you will have a configuration error. To fix this error is not necesary to flash again.
Just click in “clear names”
Select the phone model
Mark "Complet Phone".
Click in "Flash".
-----------------------------------------------------------------------------------------------
Remove the camera sound .(in silent mode)

1- Select port and velocity. Mark RTS y DTR.
2- Click in "Sony Ericsson"
3- Click "clear names"
4- Select the phone model.
7- Click in "Settings".
8- Mark "Complete Phone."
9- Click in "Flash".
--------------------------------------------------------------------------------------
Unlock Sony Ericsson phones.

1- Select port and velocity. Mark RTS y DTR.
2- Click in "Sony Ericsson"
3- Click "clear names"
4- Select the phone model.
5- Click "Unlock/Repair" and follow the instruccions on the window.

In some phones models (generaly the newest) you may use TESTPOINT to unlock your phone.

---------------------------------------------------------------------------------------
Change CDA

1- Select port and velocity. Mark RTS y DTR.
2- Click in "Sony Ericsson"
3- Click "clear names"
4- Select the phone model.
5- Seleccione un CDA Generic en mi pagina (lista de CDAs) y introduzca en la ventana CDA. Es importante que esta área no este vacía para evitar errores.
6- Select a CDA from here (select you model first):Here . Is important that this field must not be blank.
7- Click in Settings.
8-Check the boxes “Set color RED alter operatios” and “Complete Phone.”
9- Click "Flash".
--------------------------------------------------------------------------------
Set counter of total calls to zero.

1- Select port and velocity. Mark RTS y DTR.
2- Click in "Sony Ericsson"
3- Click "clear names"
4- Select the phone model.
5 - Click in Settings.
6- Mark "Complete Phone."
7- Click "UNLOCK/REPAIR".
----------------------------------------------------------------------
Write GDFS
Use this option to write you backed up GDFS to your phone:
1- Select port and velocity. Mark RTS y DTR.
2- Click in "Sony Ericsson"
3- Click "clear names"
4- Select the phone model.
5- In "Misc Files" select the file GDFS.bin
6- Click in "Write GDFS".
----------------------------------------------------------------------------------------
Change CID
1- Select port and velocity. Mark RTS y DTR.
2- Click in "Sony Ericsson"
3- Click "clear names"
4- Select the phone model.
6- Clik in the listbox "CID change" and select the CID and colour: Example RED36.
7- Click in "Flash".

Also, you can change the CID during the upgrade process, just select the MAIN and FS files, select the CID and press Flash.
------------------------------------------------------------------------------------------------Change the frecuency network.

1- Select port and velocity. Mark RTS y DTR.
2- Click in "Sony Ericsson"
3- Click "clear names"
4- Select the phone model.
5- In "Misc Files" click in […] and the file “script choosed" and press "Write Script"Here are the scripts files (choose you want): Here

After change the frecuency, your phone will be locked. “4-locks closed”. Just use the “Unlock Repair” option (explained above)
------------------------------------------------------------------------------------------------
Change SMS Tone
1- Select port and velocity. Mark RTS y DTR.
2- Click in "Sony Ericsson"
3- Click "clear names"
4- Select the phone model.
5- In "Misc Files" click in […] y selecct the file tono-sms.txt and press "Write Script"Here is the "tono-sms.txt":Here

Minggu, 14 Desember 2008

TUTORIAL testpoin use seetool

Test point SE TOOL
1.klik empty fill & repair
2. pilih model db2020
3. tekan "LANGKAH TP #1". baca"perintah" dan laksanakan.atau
3a. cek kotak di antara LANGKAH TP 1 & 2 biar otomatis langsung proses ke tp 2 kalau TPmu #1adalah OK
4. tekan "LANGKAH TP #2". baca"perintah" dan laksanakan


sekarang hape cid49 brow

5. skrng hp dlm kondisi"emptyboard,klik add dan isi format gdfs_in_ssw=== sekarang tulis db2020gdfs_in_ssw_format_CID49_BROWN.ssw"====


6. stelah flashing berjalan ok,add db2020 erom sesuai dng CIDnya= klw otp cidnya 51 bisa pake file "DB2020EROM_CNV_RED52_BROWN_CID49_DB2020. ssw", ===
peringatan;=== contoh kalau otp cidmu adalah CID51=== jangan menulis erom dengan menurunkan cid.. k800_erom_cnv_RED49_BROWN_CID49_DB2020. sswkarena telpon akan error ketika kamu melaksanakan fullflash